PNG to ICNS Conversion Script and MacOS Automation


Photo by Harpal Singh on Unsplash
MacOS comes with the tools you need to convert PNG files to ICNS files. So here is a little script that will help you convert quickly.
First, the script:
#!/bin/bash

# Check if input is passed via stdin or as an argument
if [[ -t 0 ]]; then
  s=$1
else
  read s
fi

# Ensure input file exists
if [[ ! -f "$s" ]]; then
  echo "❌ Input file does not exist: $s"
  exit 1
fi

ICON_NAME="${s%.*}.icns"
echo "Converting $s to $ICON_NAME..."

# Create an icon directory to work in
ICONS_DIR="tempicon.iconset"
mkdir -p $ICONS_DIR

# Create the first image and check for errors
sips -z 1024 1024 "$s" --out "$ICONS_DIR/icon_512x512@2x.png"
if [[ $? -ne 0 ]]; then
  echo "❌ Failed to create icon_512x512@2x.png"
  exit 1
fi

# Create all other image sizes
sips -z 512  512  "$ICONS_DIR/icon_512x512@2x.png" --out "$ICONS_DIR/icon_512x512.png"
sips -z 512  512  "$ICONS_DIR/icon_512x512@2x.png" --out "$ICONS_DIR/icon_256x256@2x.png"
sips -z 256  256  "$ICONS_DIR/icon_512x512@2x.png" --out "$ICONS_DIR/icon_256x256.png"
sips -z 256  256  "$ICONS_DIR/icon_512x512@2x.png" --out "$ICONS_DIR/icon_128x128@2x.png"
sips -z 128  128  "$ICONS_DIR/icon_512x512@2x.png" --out "$ICONS_DIR/icon_128x128.png"
sips -z 64   64   "$ICONS_DIR/icon_512x512@2x.png" --out "$ICONS_DIR/icon_64x64.png"
sips -z 32   32   "$ICONS_DIR/icon_512x512@2x.png" --out "$ICONS_DIR/icon_32x32.png"
sips -z 32   32   "$ICONS_DIR/icon_512x512@2x.png" --out "$ICONS_DIR/icon_16x16@2x.png"
sips -z 16   16   "$ICONS_DIR/icon_512x512@2x.png" --out "$ICONS_DIR/icon_16x16.png"

# Create the icns file
iconutil -c icns $ICONS_DIR
if [[ $? -ne 0 ]]; then
  echo "❌ Failed to create ICNS file"
  exit 1
fi

# Remove the temporary directory
rm -rf $ICONS_DIR

# Rename icns
mv tempicon.icns "$ICON_NAME"
echo "✅ Successfully created $ICON_NAME"
Save this script as png2icns and make it executable (chmod +x png2icns). Put
this file in a directory listed in your system PATH.
Now, you can simply run the command from any directory in your terminal like so:
png2icns exampleimage.png. It will then generate a new file named
exampleimage.icns.
Let's take it a step further so you can also run the command by right-clicking on a png image in your finder. If you don't want to go set this up manually, you can download and import my workflow here.
Open Automator and create a new quick action. Set the following options in the screenshot below:

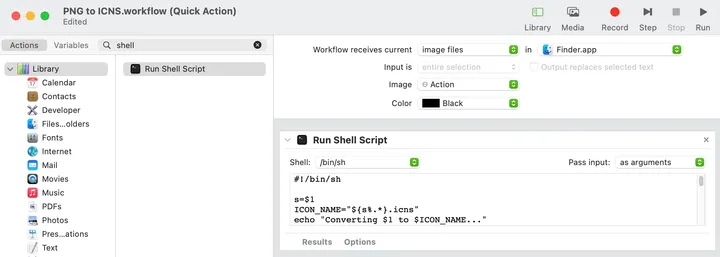
Add the Run Shell Script action. I used /bin/sh as my script. You will need
to pass input as arguments.
Then just paste in the script above and save the workflow as "PNG to ICNS" (or whatever you prefer).
You should now be able to right-click on an image and select Quick Action -> PNG
to ICNS. Your icns file should show up in your folder.

 Try EnvelopeBudget - Your grandparents' budget for the modern
age
Try EnvelopeBudget - Your grandparents' budget for the modern
age
 Need a custom website, app, or automation? Let's talk