
Get Your Feet Wet with AI for Free: Build and Publish a Website Without Spending a Dime
A step-by-step guide to trying an AI agent for free. Set up Hermes Agent with a free Nous Portal account, have it build an 11ty blog for an aspiring ghostwriter, push it to GitHub, and publish it on Netlify.
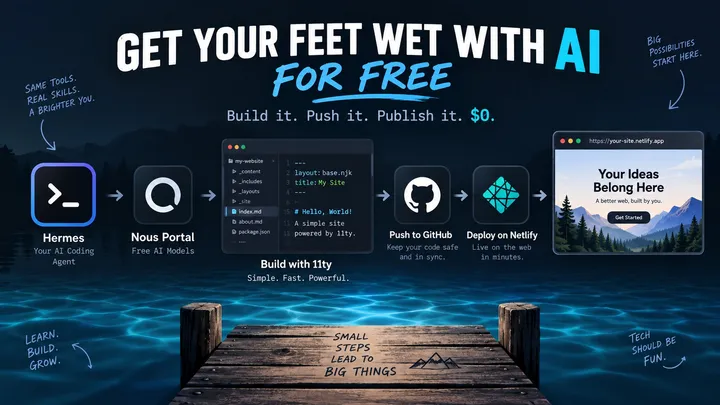
People keep asking me how to get started with AI. Not "how do I chat with a bot," but "how do I get one of these agents to actually build something for me?" And usually the next question is, "Do I have to pay for it?"
You don't. At least not to get your feet wet.
In this post I'll walk through a complete project from zero to a live website, using only free tools:
- Hermes Agent – an open-source AI agent from Nous Research that runs in your terminal. It can read and write files and run commands for you.
- Nous Portal – where Hermes gets its brains. The free plan gives you access to a catalog of free models.
- Eleventy (11ty) – a simple static site generator. It's what this blog runs on.
- GitHub – where your code lives.
- Netlify – free hosting that republishes your site whenever you push a change.
The example: a ghostwriter who needs a blog
Let's make this concrete. Meet Jamie. Jamie wants to become a ghostwriter. Potential clients will want to see writing samples, a little about Jamie, and a way to get in touch. A blog is the perfect portfolio: every post is proof that Jamie can write.
Jamie is not a developer. Jamie doesn't want to pay for Squarespace. Jamie does want a fast, clean site that they own. That's what we'll build.
Step 1: Install Hermes Agent
Open a terminal. On a Mac, that's the Terminal app. On Windows, I recommend installing WSL and working in its Ubuntu terminal.
Hermes has a desktop app you can download from the Hermes website if you prefer clicking to typing. I'm going to use the command-line version because it's what I use, and it makes the steps easy to copy. Run this in your terminal:
curl -fsSL https://hermes-agent.nousresearch.com/install.sh | bashWhen it finishes, close and reopen your terminal (or follow any instructions the installer prints) so the hermes command is available.
A general rule for piping scripts from the internet into your shell: only do it from sources you trust. If you want to peek first, open that URL in your browser and read it.
Step 2: Create a free Nous Portal account
Head to portal.nousresearch.com and sign up. The free plan costs $0/month. It comes with no credits, but you get access to the free model catalog with reasonable rate limits. That's all we need.
Nous rotates which models are free, so I'm not going to name one here and have it go stale next month. Check the portal's model list for the ones marked free.
Step 3: Connect Hermes to Nous Portal
Back in the terminal:
hermes setup --portalThis opens your browser so you can log in to Nous Portal. No API keys to copy and paste. When you come back, the setup wizard lets you pick a model. Choose one of the free ones.
Confirm everything is connected:
hermes portal infoA tip from the Hermes docs: pick a model that is good at tool calling (that's how the agent runs commands and edits files). They specifically warn that the Hermes 4 models are chat models and struggle with multi-step agent work. If a model seems to wander or refuses to actually do things, switch to another free one. You can change models any time with hermes model, or type /model inside a chat.
Step 4: Let Hermes install your tools
Here's your first taste of having an agent do the work. The site needs a few tools: Node.js (Eleventy runs on it), Git (to save your work and send it to GitHub), and the GitHub CLI (so the agent can create your repository for you). You could hunt down installers for each one. Or you could just ask:
hermes chatCheck whether Node.js (LTS), git, and the GitHub CLI (gh) are installed
on this computer. Install any that are missing using the right method for
my operating system, then show me the installed versions.It will probably need your password for some installs (sudo on Linux, or an installer prompt on a Mac). Read what it's about to run before you approve it.
The one thing Hermes can't do for you is create your GitHub account. Sign up free at github.com while it works.
Step 5: Have Hermes build the site
Make a folder for the project and start a chat inside it:
mkdir jamie-writes
cd jamie-writes
hermes chat
Now describe what you want. Be specific. Here's the prompt I'd give it:
Create a static blog in this folder using Eleventy (11ty) for an aspiring
ghostwriter named Jamie Rivers. Requirements:

- Initialize a Node project and install @11ty/eleventy as a dev dependency.
- Add npm scripts: "start" runs eleventy --serve, "build" runs eleventy.
- Pages: Home (short intro + list of latest posts), About, Services
  (ghostwriting blog posts, LinkedIn articles, newsletters), and Contact.
- Blog posts are Markdown files in a posts/ folder. Create three sample
  posts that show off different writing styles.
- Use a single Nunjucks base layout with a clean, readable, mobile-friendly
  design. Plain CSS, no frameworks. Output to _site.
- Add a .gitignore that ignores node_modules and _site.
- Add a netlify.toml with build command "npm run build" and publish
  directory "_site".
- When you're done, run the build to make sure it works. Then start the
  dev server in the background and open http://localhost:8080 in my
  browser so I can see it.
Then watch it work. Hermes will create files, install packages, and run commands. It may ask for permission before running things. Read what it's about to do and approve it. This is a good habit with any agent.
When it's done, your browser should pop open with Jamie's new site. The dev server has live reload, so from here on every change Hermes makes shows up in the browser within a second or two. Keep the browser and the terminal side by side.
If the browser doesn't open, or the server stops, just say so: "the dev server isn't running, start it again and open the site."
Now start editing
This is the part most people skip, and it's where the fun is. The first version is a rough draft. You're the editor; the agent is the typist. (Fitting, for a ghostwriter.)
Look at the page and say what you'd change, the way you'd tell a designer sitting next to you. Start big, then get picky:
The site looks too plain. Make it feel warm and professional, like a
writer's portfolio. Use a serif font for headings and a cream background.
Make the header a deep navy color. Add a "Hire me" button on the home page
that links to the contact page.Rewrite the About page. Jamie spent ten years as a marketing copywriter
and now helps busy founders publish thought leadership on LinkedIn. Keep
it friendly and under 200 words.Add a Testimonials section to the home page with three placeholder quotes.A few tips that make this go much better:
- Be specific about where. "The spacing is weird" is hard to act on. "There's too much space between the header and the first post on the home page" is easy.
- One or two changes at a time. Big wish lists make free models lose track. Small requests are easier to check, too.
- Say what's wrong, not just that it's wrong. "That didn't work, the button is still gray" beats "try again."
- Paste errors. If the page breaks or the terminal shows an error, copy it into the chat. Agents are good at fixing their own mistakes when they can see them.
- Check on your phone size. Shrink your browser window narrow and ask it to fix anything that looks cramped.
- Ask questions. "Where do blog posts live, and how do I add a new one?" or "What does netlify.toml do?" You'll learn how the site works without reading a tutorial.
- Undo is allowed. "I liked the previous header better, put it back" works fine. Once the site is in Git (next step), you also have a real safety net.
A contact form on a static site needs somewhere to send the messages. Netlify has free form handling built in. Ask Hermes to "make the contact form work with Netlify Forms," and it will add the right attribute to the form.
If you close the chat and come back tomorrow, cd jamie-writes and run hermes chat again. Start by asking it to "look at this project and start the dev server" so it gets its bearings.
Step 6: Put it on GitHub
You guessed it. Ask Hermes:
Put this project on GitHub. Set up git if it isn't configured yet (my name
is Jamie Rivers, my email is jamie@example.com), make sure the GitHub CLI
is logged in to my account, then initialize a repo, commit everything,
create a public GitHub repository called jamie-writes, and push the code.
Give me the repository URL when you're done.
Logging in to GitHub is the one part that needs you. gh auth login gives you a one-time code and opens a browser page where you paste it and approve access. If Hermes has trouble running that step inside the chat, open a second terminal, run gh auth login yourself, follow the prompts, then tell Hermes "I'm logged in, keep going."
Once the repo exists, saving your work later is just another request: "commit these changes and push them to GitHub."
Prefer to do it by hand, or curious what Hermes ran? Create an empty repository named jamie-writes on GitHub, then:
git config --global user.name "Jamie Rivers"
git config --global user.email "jamie@example.com"
and:
git init
git add .
git commit -m "Initial site"
git branch -M main
git remote add origin https://github.com/YOUR-USERNAME/jamie-writes.git
git push -u origin main
Either way, open your repository on GitHub and you should see your files.
Step 7: Publish on Netlify
First, sign up at netlify.com using your GitHub account. That part is yours. Then hand the rest to Hermes:
Install the Netlify CLI, log me in, and set up this project as a new
Netlify site connected to my jamie-writes GitHub repo so it redeploys
every time I push. Name the site jamie-writes if that name is available.
Use the build settings from netlify.toml. Give me the live URL when it's
deployed and open it in my browser.
Like GitHub, netlify login opens your browser so you can approve access. If Hermes gets stuck there, run netlify login yourself in another terminal and tell it to keep going. Connecting the GitHub repo may also send you to a browser page to authorize Netlify on GitHub.
Prefer clicking? You can do the same thing in the Netlify dashboard:
- Click Add new site → Import an existing project → GitHub.
- Pick the
jamie-writesrepository. - Netlify reads the
netlify.tomlfile, so the build command (npm run build) and publish directory (_site) should already be filled in. - Click Deploy.
In a minute or so you'll have a URL like jamie-writes.netlify.app. You can rename it in Site configuration, or connect your own domain later if you buy one.
That's it. Jamie is live on the internet.
Step 8: Writing new posts
Here's the best part. From now on, publishing a post is:
- Add a new Markdown file to
posts/(or ask Hermes to create one from your draft). - Ask Hermes to "commit and push," or do it yourself:
git add .
git commit -m "New post"
git push
Netlify notices the push, rebuilds the site, and publishes it. No logins, no dashboards.
Step 9: Teach Hermes a skill for new posts
After you've asked Hermes to create a post a couple of times, you'll notice you're repeating yourself: put it in posts/, use this front matter, name the file like this. That's what skills are for. A skill is a saved set of instructions Hermes can pull up whenever it needs them, and every skill becomes a slash command.
Ask Hermes to write one for this project:
Create a Hermes skill called new-post, saved in this project's
.hermes/skills folder. When I use it with a title, it should:

- Create a new Markdown file in posts/ named with today's date and a
  slug from the title (for example 2026-09-24-why-founders-need-a-ghostwriter.md).
- Fill in the front matter the other posts use: title, date, description,
  and tags.
- Add a short outline with an intro, three section headings, and a
  closing call to action that points readers to the contact page.
- Ask me for the post's main idea and audience if I didn't give them.
- Start the dev server if it isn't running and open the new post in my
  browser.

Look at the existing posts first so the skill matches how this site works.
Now starting a post is one line:
/new-post Why every founder needs a ghostwriterHermes creates the file, sketches the outline, and opens it in the browser. Jamie writes the words (that's the job, after all), asks Hermes for an edit pass if they want one, and then says "commit and push." A few minutes later it's live.
Saving the skill in the project's .hermes/skills folder means it gets committed to GitHub along with the site. If you'd rather have it available everywhere, ask Hermes to put it in ~/.hermes/skills instead.
This is the bigger lesson: whenever you catch yourself explaining the same thing to an agent twice, turn it into a skill.
What did this cost?
Nothing. Hermes is open source. The Nous Portal free plan gives you free models. Eleventy, GitHub, and Netlify's starter plan are all free. The only thing you might eventually pay for is a custom domain, which is optional.
Free models have limits. They're slower and less capable than the frontier models, and you may hit rate limits if you go hard. But for a project like this, they're plenty. And once you've felt what it's like to describe something and watch it get built, you'll have a much better idea of whether it's worth paying for something bigger.
The point is to get your feet wet. Go build something.