Convert Audio Clip to Ringtone - Mac Automation

Photo by Morning Brew on Unsplash
Creating your own ringtones for your iPhone is a fairly simple process:
- Find your audio source
- Create a clip of that audio (I prefer Audacity)
- Convert that audio to and AAC m4a file
- Rename the file with an m4r extension
- Use iTunes to add the m4r file to your iPhone
This tutorial will only cover steps 3 and 4 to make it easier for you.
It will require having FFmpeg installed on your machine. You can easily install it with Homebrew:
brew install ffmpegYou can now use FFmpeg to convert an mp3 file to m4a with the following command:
ffmpeg -i clip.mp3 -c:a aac -b:a 192k clip.m4aGood luck remembering that though. You could add a nice function to your .zshrc or .bashrc file:
ringtone() {
    ffmpeg -i "$1" -c:a aac -b:a 192k temp_ringtone.m4a
    mv temp_ringtone.m4a "${1%.mp3}.m4r"
}
Now you could simply run the following:
ringtone clip.mp3This would generate a file name clip.m4r
But, let's go one step further. Let's add an Automator service that will allow you to right-click on an audio file and give you an option to convert it to a ringtone.
Step 1: Open Automator
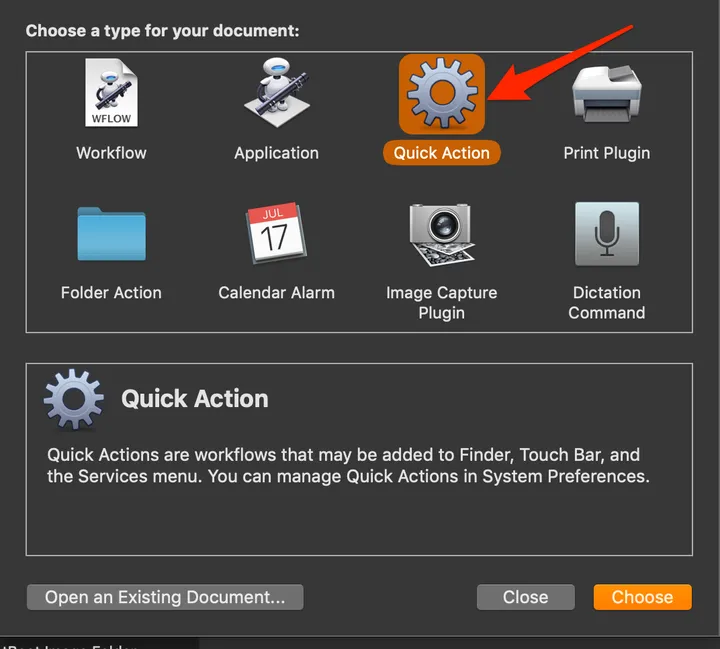
Step 2: Select File > New and then select "Quick Action"

Step 3: Set the following options:
Workflow receives current: audio files
in: Finder.app
Image: Audio

Step 4: Drag the Run Shell Script action into your workflow

Step 5: Set the Shell and Input parameters
Shell: either /bin/bash or /bin/zsh
Pass input: as arguments
Step 6: Add the following script:
/usr/local/bin/ffmpeg -i "$1" -c:a aac -b:a 192k temp_ringtone.m4a
mv temp_ringtone.m4a "${1%.mp3}.m4r"
Step 7: Save the Automation
Press ⌘S to save. Name it something like "Create Ringtone"
Step 8: Test it out!

If you just want the workflow, you can download it here. Create-Ringtone.workflowDownload
 Try EnvelopeBudget - Your grandparents' budget for the modern
age
 Need a custom website, app, or automation? Let's talk
